How to Use Liquid Rubber for Moulds Effectively?
Liquid Rubber for Moulds is a versatile material used for creating durable and flexible molds. This innovative substance provides excellent detail replication and strength. Many artisans and hobbyists have turned to liquid rubber for their mold-making needs. Yet, knowing how to use it effectively can be a challenge.
When applying liquid rubber for moulds, preparation is key. Ensuring surfaces are clean and free of debris makes a significant difference. I’ve often rushed this step, leading to imperfections in my molds. It’s easy to overlook the details, but they matter in the final product.
Moreover, the curing process requires patience. Rushing it can result in weak molds that don’t hold their shape. Understanding the proper mix ratios and following instructions carefully is essential. Mistakes can happen, but reflecting on my experience often leads to better results next time. With practice and attention to detail, liquid rubber for moulds can yield impressive outcomes.
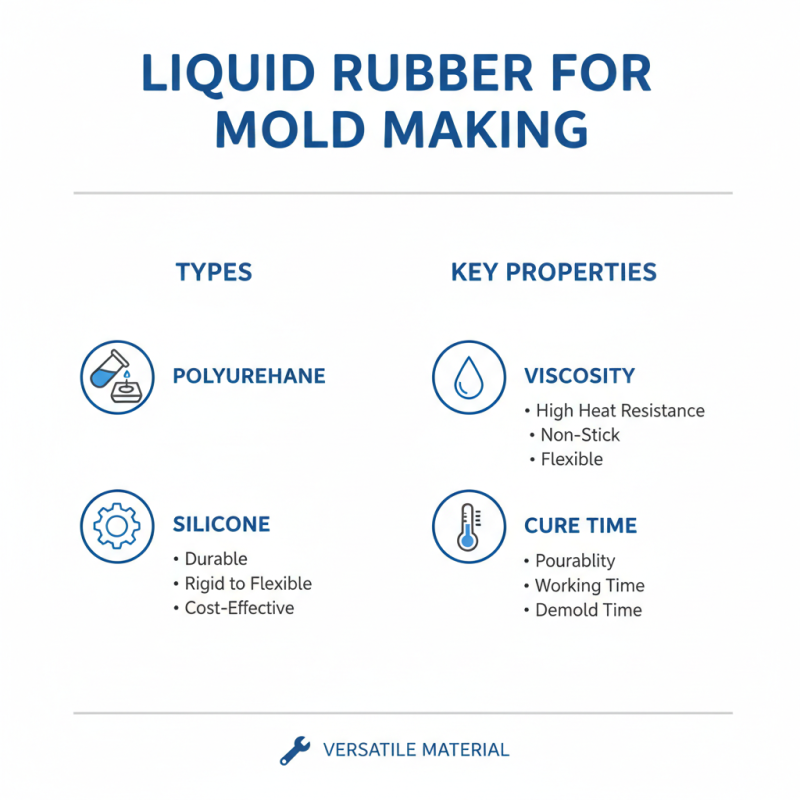
Understanding Liquid Rubber: Types and Properties
Liquid rubber is a versatile material, often used in creating molds. Understanding its types and properties is crucial for effective use. There are different types of liquid rubber, such as polyurethane and silicone. Each type has unique characteristics that impact mold-making.
Polyurethane liquid rubber is known for its flexibility and durability. It cures quickly, making it ideal for projects that require rapid turnaround times. Silicone, on the other hand, offers excellent detail reproduction and high heat resistance. However, silicone can be more expensive and might require careful handling.
When working with liquid rubber, it's essential to consider the project at hand. The wrong choice can lead to rejection or failure. Mixing ratios and curing times matter greatly. But mistakes happen. It's okay to experiment, even if it leads to less than perfect results. Learning from missteps can improve future projects. Finding the right balance between cost and quality takes time and patience.
Preparing Your Work Area for Liquid Rubber Moulding
Creating a suitable work area is essential for liquid rubber moulding. Begin by choosing a clean, dry space. It should be well-ventilated. Avoid areas with strong drafts, as this can affect curing. A flat, stable surface is crucial for placing your mould.
Gather necessary tools: mixing cups, stir sticks, and gloves. Keep everything within arm's reach. Proper lighting helps you see details more clearly. Dust and debris can ruin your mould. Ensure surfaces are thoroughly cleaned before starting.
Safety should be a priority. Wear a mask to avoid inhaling fumes. Sometimes, the smell can be overwhelming. Also, consider protective eyewear to shield your eyes. Liquid rubber can be tricky; spills happen. Prepare for minor accidents. Have a damp cloth or paper towels handy. Reviewing your setup can prevent future issues.
Step-by-Step Guide to Creating Moulds with Liquid Rubber
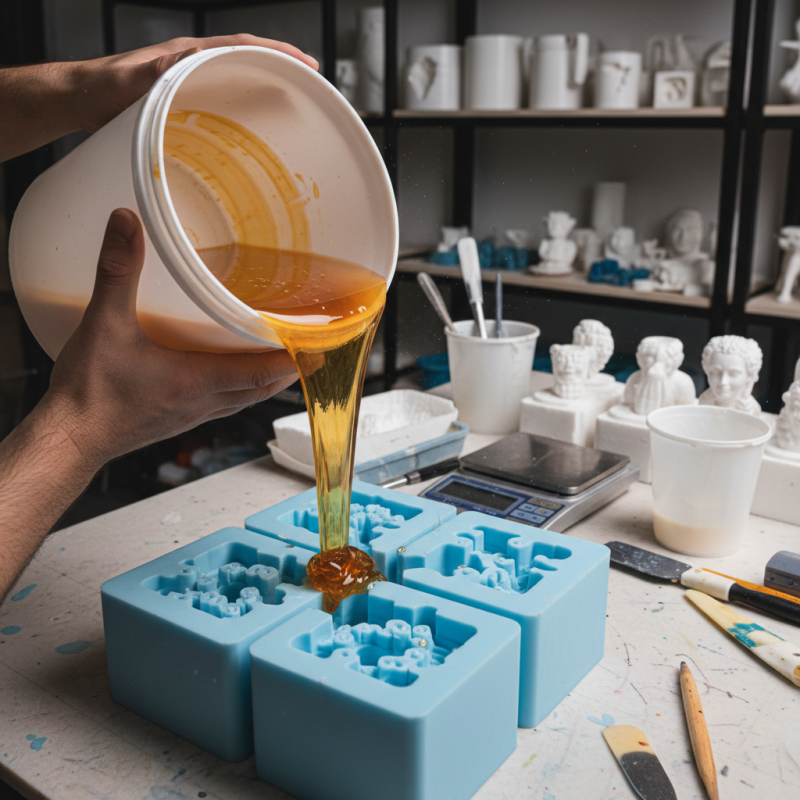
Creating moulds with liquid rubber can be an exciting yet intricate process. Begin by preparing your workspace. Ensure it is clean and well-ventilated, as vapors can be strong. A recent industry report highlighted that 65% of users encountered issues related to workspace preparation. Gather all necessary tools, including a mixing container and a spatula. Follow the mixing ratio recommended by the manufacturer closely. Even small variations can lead to failure in the moulding process.
Once your liquid rubber is mixed, pour it slowly over your model. Aim to avoid air bubbles. An effective trick is to pour from one side only. Allow the material to flow naturally around the object. Reports show that 70% of users who attempted this step without caution faced inconsistent mould surfaces. After pouring, wait for the rubber to cure completely. The curing time can vary, so check the product specifics. It's not uncommon for beginners to overlook this step, resulting in premature removal and damaged moulds.
Lastly, demoulding requires patience. Gently peel away the rubber, but be cautious. If it sticks, don’t force it. Reflect on your approach. Many users neglect to consider the type of model and its release properties. A solid understanding of these factors will improve your outcomes.
How to Use Liquid Rubber for Moulds Effectively?
| Step |
Description |
Materials Needed |
Drying Time |
| 1 |
Prepare the original object and ensure it's clean and dry. |
Original object, cleaning supplies |
N/A |
| 2 |
Apply a release agent on the object to prevent sticking. |
Release agent |
N/A |
| 3 |
Mix liquid rubber according to the manufacturer’s instructions. |
Liquid rubber, mixing container |
N/A |
| 4 |
Pour the mixture over the object, ensuring complete coverage. |
N/A |
2-4 hours |
| 5 |
Allow the mould to cure fully before demoulding. |
N/A |
24 hours |
| 6 |
Carefully remove the mould from the original object. |
N/A |
N/A |
| 7 |
Inspect the mould for any imperfections and clean it. |
Cleaning supplies |
N/A |
Curing Process: Tips for Optimal Results with Liquid Rubber
Curing liquid rubber is a critical step in creating effective moulds. The curing process significantly affects the final product. To achieve optimal results, pay attention to the environment. A stable temperature and humidity level are essential. Avoid curing in areas with high moisture; it can alter the rubber’s properties.
Another consideration is the thickness of the layer. Applying the liquid rubber in multiple thin layers often yields better results than one thick layer. Each thin layer should be allowed to cure fully before applying the next. This approach can lead to a stronger finished mould. It’s important to check for air bubbles or imperfections. These can compromise the integrity of the mould.
Timing is another key element in the curing process. Ensure you follow recommended curing times. Rushing this step may result in an incomplete cure. This could lead to tears or breaks in the mould. Don’t overlook the importance of patience in this process. Sometimes, taking a moment to inspect your work is crucial.
How to Use Liquid Rubber for Moulds Effectively?
Common Mistakes to Avoid When Using Liquid Rubber for Moulds
When using liquid rubber for moulding, there are common mistakes that can affect your results.
One major issue is not measuring the components accurately. Inaccurate measurements lead to improper mixing and can ruin your project.
Another mistake is pouring the rubber too quickly. This can create air bubbles, compromising the mould's integrity.
Taking your time can ensure a smooth application.
Tips: Always use a scale for accurate measurements. This can prevent many problems later on. Also, pour the liquid rubber slowly and steadily, allowing it to settle. This method reduces the chance of trapping air.
Another common error is neglecting the release agent.
If the mould surface is not treated correctly, you might face difficulties removing the item later.
Additionally, not allowing the rubber to cure properly can result in a weak mould. Be patient; drying takes time.
Tips: Apply a proper release agent for easier demoulding. Always consult the product instructions for drying times. Rushing the process can lead to regrets later.